Google Cloud Print for Schools


It came up while working with PS/IS 157 training this Saturday with the Google PD Trainer Series. Google has a way to wirelessly link classic printers so you can print form anywhere in Google Chrome.


  • You're at home working on your lesson in Google Docs for the the next day and you want to be sure you have a copy on your desk. Google Cloud Print. 
  • You need 60 copies of a worksheet you made in Google Drawing for tomorrow but you know the copier will be backed up with a line in the morning. Google Cloud Print. 
  • You are in another section of the building and not at your desk with your desktop printer but you need to print a a Google Sheet. Google Cloud Print. 


While I'm one for going paperless I do recognize some people's addiction to paper artifacts. Here's how you can set up Google Cloud Print to take advantage of cloud printing. Google provides some good instructions as well.

There are some caveats to keep in mind when you do this.

1. You must have a computer actually hooked to the printer either wirelessly through a network or classically through a cable.
2. The computer connected to the printer must be on and logged into the account sharing the printer.

You may have an inkjet on your desk connected to a desktop computer but you roam around the school with a laptop for various collaborative meetings. The desktop is your point connecting to the printer. This desktop must be on and logged in to the Google account sharing the printer. The Google account can be your own account. This account will share and manage the printer. To make this a cloud printer go to chrome://devices/
Any devices you currently have connected as cloud printers will show here. You will also see the printers which are available to connect. So if you have never done this you will see under New Devices the installed printers on your computer. Clicking Register will allow you to register that printer as a cloud printer. Note that if the printer is a new wireless printer there may be extra security on the printer's menu in place requiring you to approve it


You will get a series of alerts asking you to confirm the addition of the printer. Once added it will be part of Google Cloud Print on your account. Once you have it on cloud print on that desktop you can get the share link to attach the printer to your laptop or send it to others. you are also able to set daily limitations on how many pages can be printed.


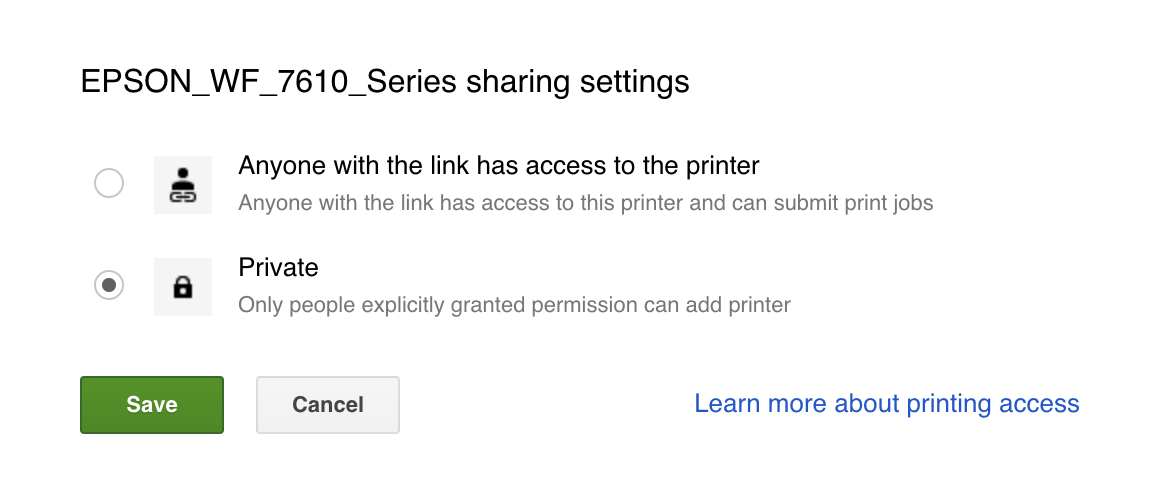
Clicking the Green Share button allows you to share the selected printer. You will then change the printer from Private to "Anyone with the link has access to the printer"


This will then open the dialog to adjust the quota (it's 15 pages/day by default) and get the link. You can also share it out like you would a google doc by typing people's google email in.


From here is as easy as selecting the printer when you go ahead and print.

For best practices in a school if you have a networked high performance copier where teachers regularly make their copies I'd recommend connecting this device as a Google Cloud Printer. You can also use small desktop printers but these can get a lot of wear if shared with a full faculty. Share only to small groups.


  1. Identify and old computer which can remain on and online all the time. 
  2. Create an account in your G-Suite domain to manage all the printers. 
  3. Connect the identified computer to the printer(s). 
  4. Log in to the printer Google account and leave it logged in on that computer. 
  5. Setup your cloud printers on the account and share directly with the personnel you want to have access. Avoid giving the link as this can then be shared with those you don't want to have access. 
  6. Shared members will get an email with a link to add the printer. 
  7. The printer shows up in Chrome with the Blue Person icon.


Enjoy Google Cloud Print! It's marked as still in Beta so we may see more features with it in coming years.

Visual Program - A response to "Why it's a bad Idea" by Mike Hadlow


After reading Mike Hadlow’s post on his blog titled “Code Rant: Visual Programming - Why it’s a Bad Idea” I feel I need to respond. Mike references block based coding such as the education tool “Scratch” from MIT. He points out three reasons why he thinks block based coding is bad. "1. Textual programming languages obfuscate what is essentially a simple process. 2. Abstraction and decoupling play a small and peripheral part in programming. 3. The tools that have been developed to support programming are unimportant."

What he doesn’t take into account is how we learn to code and think computationally. There is a process of learning how to identify a problem, pull a problem a part, break it down into abstract representational ideas, and build a step by step procedure to solve the problem. These parts can be looked at using a design thinking flow where we continually reconsider what we are doing and if out solution works. As we teach young students how to think computationally it’s helpful to have a system which can give immediate results. Block-based/visual coding is intended for the novice programmer. It’s there to give quick results without concern for syntax. The blocks don’t allow for syntax errors. 

I'm guilty of spending hours staring at code and going through debugging steps only to learn I spelled something wrong. When you start with code this sort of bug is enough to made you never want to code again. Perseverance does not happen over night. It's built incrementally. Block-based code allows for quick success of code without the headache.

Coding is very different from math but has similarities in how we grasp the concepts. Teaching coding requires giving the code concept to start. Allowing the student to modify the given code to see what happens. Then tasking the student to create something using the code and any other code or creative tools they can bring in. This iterative education process works best with visual code when there is no concern about syntax errors. The only errors are in how the code is put together. 

Do specifically address Mike's points:

1. Textual programming languages obfuscate what is essentially a simple process.
To a seasoned programmer this is very true. After I learned how to code with interpreted languages like JavaScript I've had that question of, "How does it really do that?". Even text-based code can obfuscate a simple process. Many languages have text functions build in, ie Left(data, count of characters). The function is slicer of the data inputed. This is not a concept a novice needs to know as they use the Left function. The real mechanics are hidden. Visual code also hides the actual functions. 

2. Abstraction and decoupling play a small and peripheral part in programming.
I firmly disagree with this. When building a realistic game you need to provide gravity. Well, how do you give an accurate representation of gravity? How do you designate where the floor is? How high can your character jump? These are abstract concepts which can be represented by an algorithm. Students can't figure it out unless they explore the abstraction of gravity. Yes things get complex but part of coding is creating efficient code which interacts seamlessly and simply with other code. Gravity can become a function with quick inputs making it fairly universal for each character. Complexity can increase by adding more features but well built functions help to Make sense of it. 

3. The tools that have been developed to support programming are unimportant.
The tools that have been developed to support programing are what make it accessible to others. I've programmed in a raw text editor for years. I torture myself so I memorize code functionality. For a novice the tools to support programming are what make the difference. I spend a lot of time playing with Google Apps Script. The intelligent suggesting of options support my exploration and make me more efficient. Google provides suggestions to code; intelligent suggestions. I know my variable is not initialized because of the color signifier. It's a pleasure to program with Google and it's the coding environment which keeps me coding there. I promote Google Apps Script because it's easy to code in. 

I will say block based coding can be improved by providing tools to transition from the visual code to a syntactical base. Allow me to pull in the code in visual format. But give me the ability to pull back the visual curtain. Block based code makes it accessible to those that may have previously been intimidated. And let's face it, we can type faster than we can drag in code. once we start getting the hang of it we lean to typing the code. 

Non-technical people need to have access to coding. It's up there with learning math, language, science, history and arts. our lives are split between our digital life and our physical life. I can cook and make a basic meal in my physical life. Coding is relative. People need to know how to craft some basic code to help them solve a problem in their digital life. 


And just for fun here's a Scratch project I did in 10 minutes to teach about conditionals.


Shift+Z - Tag Files and Folders to Multiple Locations

While training this past weekend I shocked some veteran trainers with a little trick. While I didn't know the ins and outs of the trick, together we explored the feature (Thank you Santi, Stephanie, Anthony, and Cindy). So from our collaboration here's a neat trick to further help organize your data in Google Drive.

Ever needed to have a file or folder in two places at once? Perhaps you have your way of working and structure to your files but some one else needs to see those files in their own file structure. Welcome to Shift+Z for Google Drive.

We look at and think of files and folders in a tree structure. This has been the structure of computer files since early on. But it's not actually how Google stores your files and folders. Google files are stored in a massive database rather than a traditional hard drive structure with indexes to addresses on a physical memory of your items. This database structure allows a lot more flexibility of your data. It's also stored in a column referenced structure so your data can be accessed much faster among trillions of other files.

To take advantage of this structure files are marked with tags which indicate to us the visual structural layout. Because tags are metadata or data about our files much more information can be provided and our files don't really exist in true folder directories. You may be familiar with this with gmail. Adding Labels works in the same manner. Your message is visually located in multiple places at once.

Shift+Z allows you to tag your file to other places in your drive. You can have your file in a folder you normally work with it and tag it to also show up in a shared folder. The file is not a copy it's the same file just in multiple locations. To do this:


  1. Click the file or folder you want to tag to another location.
  2. Press Shift+Z on the keyboard. (Shift key and the Z key at the same time)
  3. A selector will open asking where you want to tag the file to. Navigate to the other location.
  4. Once you have the new location selected Click Add. Your file or folder is now in both places.


To see the locations the file exists in or to remove it from a location:
  1. Right click the file or folder. 
  2. Select "View Details". 
  3. The sidebar will show up on the right.
  4. You will see the locations the file is tagged to under Location:
  5. Clicking the X by a location will remove it from that location.


Social Emotional Well-Being During Online Teaching and Learning

The world is a bit nutty right now because of the COVID-19 pandemic. Schools are switching to online learning and parents are working from...