Showing posts with label GSuite. Show all posts

Google's Accessibility Menu Isn't as Accessible as It Could Be

Profile on a face with sound waves depicted from the mouth

When Google announced the Accessibility menu in G Suite I was excited for the various possibilities of this tool. My focus was on the screen reader. We all learn best in various ways. Accessibility tools shouldn't be considered just for those with special needs they can benefit all of us. Screen reader allows document text to be read back to the user. It also verbalizes the menus and actions the user is taking on the screen.

Image of the Tools menu with Accessibility Settings highlighted at the bottom
 Accessibility menu with Turn on Screen Reader Support checked off and Turn on collaborator announcements turned onImage of the accessibly menu

While I conducted a training the Accessibility menu was asked about. I hadn't previously had the time to explore it. The menu had just appeared on the school's domain teacher thought it could help a lot of students with various tasks. I was on my Macbook Pro and turned on the accessibility screen reader, "Speak" ...nothing. Teachers were on various PC's and turned on their Speak from the Accessibility menu. Again, nothing. I had to move on with the training but aimed to circle back and explore it in my own time.

What I've found is that the Accessibility menu relies on the native device features to work with the Chrome browser. Mac relies on VoiceOver. PC relies on NVDA. Chromebooks have ChromeVox built-in.  The menu assumes there is already a screen reader installed on the system and being used rather than providing a quick and easily accessible functionality switch.

My expectation and the teachers' I was training expectation was to turn on the screen reader as we turned on accessibility. Unfortunately there is a whole install and enabling procedure which complicates use for many schools due to how they are setup. Extensions for Chrome browsers are often turned off for schools with Macs and PCs. Chromebook users have it easier with the ability already setup on their operating system. The ChromeVox extension is recommended, however there's no way to turn it on and off.

Instant screen reading is what was expected but the difficulty in engaging with the Accessibility menu had me look else where for options. The menu is intended for full screen reader ability in the Chrome browser. What the teachers needed was a way to have text read back. This is a different level of accessibility from what the Accessibility menu provides. I pulled up an extension I've used with English language learners called Read Aloud: A Text to Speech Voice Reader. The extension allows more reading control and highlighting of text with voice selection.

To further complicate usage of Accessibility tools there is a long list of complicated key stroke combinations to access various elements on the screen. If you have ever had the change to unlock a secret level through some button clicks on your controller Accessibility is very similar. You don't unlock a hidden level after pressing Ctrl+ ⌘ + Shift + N you just move to the next table. The list of these key codes is immense and requires further memorization to take advantage of. Such elements create further barriers to accessibility. There is also no access to customize such key codes to accommodate a user. We really need to rethink how we provide access to elements on the screen.

I applaud Google for including Accessibility features in the G Suite, but I'm ultimately disappointed in how the Accessibility needs to be setup, the lack of simple controls and transparency for usage. Don't expect to turn on the Accessibility Menu and find things accessible. Ultimately we need to provide users various levels of accessibility and accessibility needs to be easily accessible and adaptable for all.


Google Cloud Print for Schools


It came up while working with PS/IS 157 training this Saturday with the Google PD Trainer Series. Google has a way to wirelessly link classic printers so you can print form anywhere in Google Chrome.


  • You're at home working on your lesson in Google Docs for the the next day and you want to be sure you have a copy on your desk. Google Cloud Print. 
  • You need 60 copies of a worksheet you made in Google Drawing for tomorrow but you know the copier will be backed up with a line in the morning. Google Cloud Print. 
  • You are in another section of the building and not at your desk with your desktop printer but you need to print a a Google Sheet. Google Cloud Print. 


While I'm one for going paperless I do recognize some people's addiction to paper artifacts. Here's how you can set up Google Cloud Print to take advantage of cloud printing. Google provides some good instructions as well.

There are some caveats to keep in mind when you do this.

1. You must have a computer actually hooked to the printer either wirelessly through a network or classically through a cable.
2. The computer connected to the printer must be on and logged into the account sharing the printer.

You may have an inkjet on your desk connected to a desktop computer but you roam around the school with a laptop for various collaborative meetings. The desktop is your point connecting to the printer. This desktop must be on and logged in to the Google account sharing the printer. The Google account can be your own account. This account will share and manage the printer. To make this a cloud printer go to chrome://devices/
Any devices you currently have connected as cloud printers will show here. You will also see the printers which are available to connect. So if you have never done this you will see under New Devices the installed printers on your computer. Clicking Register will allow you to register that printer as a cloud printer. Note that if the printer is a new wireless printer there may be extra security on the printer's menu in place requiring you to approve it


You will get a series of alerts asking you to confirm the addition of the printer. Once added it will be part of Google Cloud Print on your account. Once you have it on cloud print on that desktop you can get the share link to attach the printer to your laptop or send it to others. you are also able to set daily limitations on how many pages can be printed.


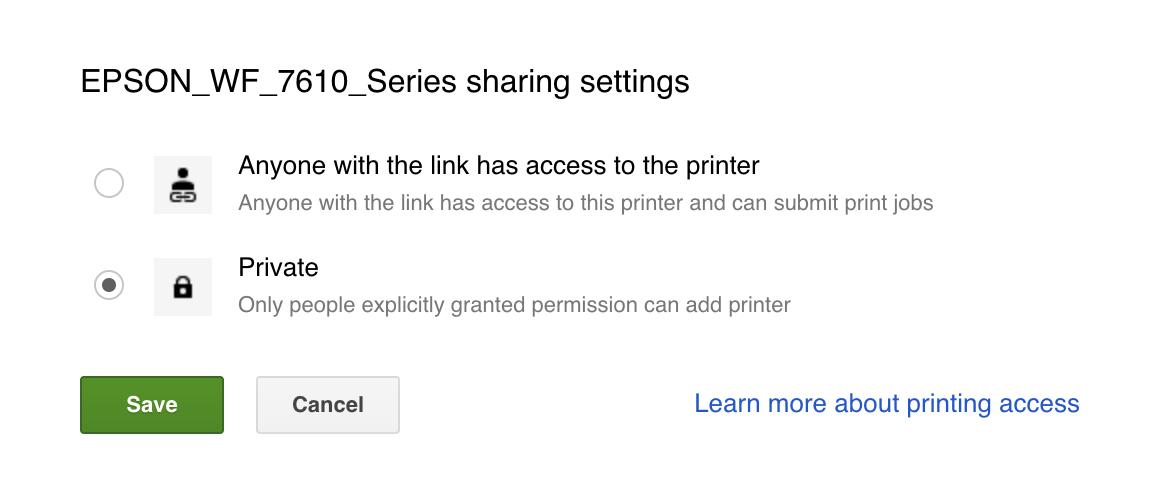
Clicking the Green Share button allows you to share the selected printer. You will then change the printer from Private to "Anyone with the link has access to the printer"


This will then open the dialog to adjust the quota (it's 15 pages/day by default) and get the link. You can also share it out like you would a google doc by typing people's google email in.


From here is as easy as selecting the printer when you go ahead and print.

For best practices in a school if you have a networked high performance copier where teachers regularly make their copies I'd recommend connecting this device as a Google Cloud Printer. You can also use small desktop printers but these can get a lot of wear if shared with a full faculty. Share only to small groups.


  1. Identify and old computer which can remain on and online all the time. 
  2. Create an account in your G-Suite domain to manage all the printers. 
  3. Connect the identified computer to the printer(s). 
  4. Log in to the printer Google account and leave it logged in on that computer. 
  5. Setup your cloud printers on the account and share directly with the personnel you want to have access. Avoid giving the link as this can then be shared with those you don't want to have access. 
  6. Shared members will get an email with a link to add the printer. 
  7. The printer shows up in Chrome with the Blue Person icon.


Enjoy Google Cloud Print! It's marked as still in Beta so we may see more features with it in coming years.

Looping Through Data


I don't know about you, but I often organize students with google sheets. I use rows for each student and columns for information related to the student. Sometimes I need to push this informatiuon back to students or parents. Sometimes I have do something else with the information. It’s helpful to know how to get the data and work with it in a loop.

Spreadsheets are a two dimensional arrays. There is information in Rows, dimension 1,  and information in columns, dimension 2. We can target each cell by knowing the proper row and column.

We can also loop through each row and do something with the data. 

Computers start counting from 0. Google Sheets starts counting the informational rows and columns from 1. I will also use my own label in row 1 to identify the column number. This way I can insert columns and move them around and still retrieve the same information. Let’s start with identifying the columns by our own labels and setting the column number to a variable which makes sense to us. 

function loopThroughData(){

  var ss= SpreadsheetApp.getActiveSpreadsheet();
  var sheet= SpreadsheetApp.getActiveSheet();
  var emailcol = getColumnByName(sheet, "Email");
  Logger.log(emailcol);
}

function getColumnByName(sheet, name) {
  var range = sheet.getRange(1, 1, 1, sheet.getMaxColumns());
  var values = range.getValues();
  for (var row in values) {
    for (var col in values[row]) {
      if (values[row][col] == name) {
        return parseInt(col)+1;
      }
    }
  }
}

A function called getColumnByName is used in our loopThroughData function. It’s used with two variables pushed into it. The first is the sheet we are working on and the second is the column name. This function runs and will return the column number if the column name is found. The program returns to the loopThroughData function and completes the script Logging the column number. 
This begins to give us some flexibility with the sheet. We can add and move columns and not work about breaking our program. We can run it and we’ll see the column number returned in the log. The intent here is to be able to loop through and use data in a full sheet. We know how to get the column numbers but what about the rows and the rest of the data. 

Efficiency in code so far doesn’t seem like a big deal. We’ve looked at very little data. But if we were to use an entire sheet composed of the maximum 5,000,000 cells (as of the newest 2018 update) we need to start being aware of how long each step of code takes. Even if we consider using up to 1,000,000 cells it can take longer than we expect to finish our script. Attendance data can exist in large data sets. Consider a school of 400 students * 180 school days * 7 classes each of attendance. 504,000 cells of data. If a step of our program takes .01 seconds it will take 5,040 seconds to complete or 84 minutes or 1 hour and 24 seconds. And that’s just one step. So while we can pull each cell individually with sheet.getRange(row, column).getValue() we need to ask ourselves if it’s the most efficient. 

Our loop will instead pull all the data, once, and reference it in the computer memory. Below I concentrate on our main function our getColumnByName should remain in the script. I usually keep functions I use in larger functions at the bottom on all my scripts. 

function loopThroughData(){
  var ss= SpreadsheetApp.getActiveSpreadsheet();
  var sheet= SpreadsheetApp.getActiveSheet();
  var emailcol = getColumnByName(sheet, "Email");
  var data = sheet.getDataRange().getValues();
  for (var i =1;i<data.length;i++){
    Logger.log(data[i][emailcol-1]);
  }
}

The variable data is the used area of the sheet. It provides data in a matrix format. The first referenced data index is the row. The second is the column. We would use a reference to the index number of the row and column to reference a value. The index starts from 0 so row 0 is our header. In the sheet it’s row 1.Our column   numbers compared to the sheet are all offset by -1. To return the header cell containing “Email” we can use row 0 and column emailcol-1. We’d write it like this in our script.

data[0][emailcol-1]

The square brackets [] are used to indicate an index number. They can be strung together to reference indexes of indexes.

Now that we have a concept of indexes we are going to use a for loop to walk through our rows of data. For loops have three inputs to get them started. First a variable to count with set to the first number; var i = 0. Then the end of the loop as an expression. I usually think “while” in my head as I write it; i<data.length. And finally an increment for our counting variable to increase by with each loop; i++. JavaScript allows the short hand of using ++ to increment by 1 rather than i=i+1.

Here’s our initial for loop. 
for (var i =1;i<data.length;i++)

The loop needs to know what to do each time around. We put an action inside curly brackets { and }. We can also use the i variable in our action. 

data[i][emailcol-1]

With data we are saying return the second row (computers start from 0 and i starts being set as 1 se we are skipping our header row) and the column of the email (we assigned emailcol as the sheet column which is now offset in data by -1 so we offset the email column number by -1).

Putting it all together we can loop through the data and do something with it. Above we are returning whatever is in the email column and putting it in the log. We can instead send emails, create slides, make websites or many other operations which we would do manually but take a lot of time. Here's a sample sheet that sends out emails. 
Sample

Enjoy!

Send an Email with a Function: Part 2

There are times that automated email can be very helpful. The concept I'm going with here is aligning to a form response. When we ask folks to sign up for something we sometimes need them to have materials or may want to customize the response. Yes, in Forms you can customize a response to the form but what if you want to get fancy? Say people are filling out a form for an audition (I was in the entertainment industry so I'm using an example personal to me) they are going to need to audition materials and information for the particular role they are auditioning for. Here's where a script can help you to select who receives what.

Let's go back to our form we were collecting emails on. We'll keep this simple to begin then I'll give you a case where it can be expanded.

Open the Scripts Tools>Script editor. You should have:
function formResponse(e){
   Logger.log(e.values[0]);
}

Try changing it to:

function formResponse(e){
   Logger.log(e.values);
}

Submit a form response again. 

The 0 index of the form response is the timestamp. If we modify our log to get the value of e, Logger.log(e); we will get all the information returned. Logger.log(e.values); will return all the values of the form response. 
We want to identity the index of the email address. If you are collecting emails automatically if will likely be index 1 or e.values[1]. If you are collecting emails in your form it will be listed in the form at an index relative to all other information you may be collecting. If you have turned on the automatic collecting of email and turned it back off you may have also created an index with no information or null. 
Your incoming data may look like this [9/16/2018 11:03:52, clay@claycodes.org, Clay Smith, Danny] or [9/16/2018 11:05:21, , Clay, Danny, clay@claycodes.org] or something else. 

Each index is separated by a comma. If we want to get the values of a particular index we can use the index number. There are other methods but this is a good concept to start with. 

function formResponse(e){
   Logger.log(e.values);
}

Our function returns all the values to the log. It's now time to start doing something with the values. We want to send an email when some one submits the form. Let's set a variable to be the email address. We can do this with: 

var email = e.values[4]; 

The 4 index is from the image sample above. Your index may be different.

Next let's identify a file URL we want to include in our email. To make it easy here's a link to Bloom's Taxonomy verbs. https://drive.google.com/file/d/0BxUJf-bQ7_PzNnFKMXdOUjJGZGM/view?usp=sharing
We can assign this link to a variable by typing: var fileurl = 'https://drive.google.com/file/d/0BxUJf-bQ7_PzNnFKMXdOUjJGZGM/view?usp=sharing';
I've made up the variable name fileurl just like I did email. I'm using the apostrophe, ', mark to indicate the data is a string or typed letters and not something to be calculated. The apostrophe encloses the information on each end. 

We'll make a variable for the body and include some characters which will be escaped. Meaning they are normally reserved for programming but we will tell the program not to read them as part of the programing. 

var body = 'Thanks for filling out the form here\'s a document to read before we begin. \n ' + fileurl;
The \ is used to escape characters. The apostrophe typically represents the end of a string of characters, in this case we're using it grammatically. So we escape it with \'. Looking at the other escape character we see \n representing a new line. The + symbol is used to put things together. just like we would add 2 and 2 to get 4 a string gets added to make a longer string. The fileurl is a variable so it doesn't go in apostrophes or the system will think it's the word fileurl. 

Now let's put these elements together as an email. 

var mail = GmailApp.sendEmail(email, 'Subject goes here' , body);

The GmailApp loads a library of possible functions. We are using the pre-made sendMail which takes in three inputs, an email address, the subject of the email, and the body of the email. We could have used a variable for the subject but here I've entered it as a string to build on the idea that we don't have to always create variables. we could also replace the variable email with e.values[4] and it will still function.

Putting it all together looks like:

function formResponse(e){
  Logger.log(e.values);
  var email = e.values[4];
  var fileurl = 'https://drive.google.com/file/d/0BxUJf-bQ7_PzNnFKMXdOUjJGZGM/view?usp=sharing';
  var body = 'Thanks for filling out the form here\'s a document to read before we begin. \n ' + fileurl;
  var mail = GmailApp.sendEmail(email, 'Subject goes here' , body);
}

Google handles a lot of security for you. To be sure all the security is engaged for our function let's try running it. It will give us an error but before it does it will go through the permission checks and allow the mail feature to work. Click Run>Run function>formResponse
Accept the permissions and we'll be ready to submit through the Form. 


Go ahead and submit a new form with your email address. Check your email. You should get the response from the script you wrote. Congratulations!!!

So here's a use case which may help. Let's use the audition example. We'll add a dropdown of role with two selections. Danny or Sandy. We'll create an if statement to change the fileurl based on the role. We could also change the text of the body and subject by using the conditional statement but we'll keep it simple. 

function formResponse(e){
  Logger.log(e.values);
  var email = e.values[4];
  var role = e.values[3];
if(role == 'Danny'){
   var fileurl = 'https://drive.google.com/file/d/1-hGi-F7EAi4pBXoDoZHzLQ2qasJ4ie2F/view?usp=sharing';
}else if(role=='Sandy'){
   var fileurl = 'https://drive.google.com/file/d/1t7bVocmj9QaHApIIlc91l3RARg4gXoKa/view?usp=sharing
}
  var body = 'Thanks for filling out the form here\'s a document to read before we begin. \n ' + fileurl;
  var mail = GmailApp.sendEmail(email, 'Subject goes here' , body);
}

onFormSubmit Do Something: Part 1


Did you know Google Scripts can be triggered when a form submits to do something? Assigning a function to the onFormSubmit trigger and it will call that function. Let’s build one now to email a response to a submitted form.

We all have sign-ups we use with our school community. Sometimes when some one signs up we need to provide them with a document and other information. With Google Apps Scripts we can automatically send an email to the person that signed up with attachments.  

Let’s explore. 
Start by creating a form. Be sure to turn on the Email capture or make a field for people to type their email and validate it as an email. Add any other questions to your form that you like. Keep the Allow only 1 response off so we can test with our own email multiple times.

Our script will be built in Google Sheets. IN the form responses link the responses to a new sheet. Open the sheet and select Tools>Script editor. The editor will open in a new tab. Give a name to your script. Remove the pre-populated function, myFunction, so we are working with a blank area. Let’s begin our function:

function formResponse(e){
}

I’m calling it formResponse because it makes sense to me. I made up this name for the function. It’s also case sensitive. So if I use it later I have to be sure it’s typed exactly the same way. 
This function is going to take an input of e.  e represents the form response. Let’s first take a look at what e looks like when it’s received. We’ll use the Logger for this. In the function type Logger.log(e);

function formResponse(e){
   Logger.log(e);
}

Now let’s hook up the trigger before testing. Click on the button that looks like a clock. 

This will open the Trigger settings. Click "No triggers set up. Click here to add one now." to add a trigger.


It will likely automatically populate the function we create. The Run column identifies the function to activate. The Events column gives the selection to happen either when something in the spreadsheet happens or time based. The last column is the specific event triggering the function. We can add more than one function to activate when triggered and multiple triggers.


Click Save to save the trigger to our form. You will be asked to approve some permissions. Click Review Permissions. Select your account, then click Allow on the next screen.


Now let's see what data looks like when it comes into the form. Open the form in submission mode. Fill it out and click submit. Our function will have captured the submission in the Logger. To get to the logger click View>Logs. This will open a window floating over our script with the data from the form submission.

When we look at the Logger we are seeing the form submission in the form of a program object. Let’s look closely at the label values. Notice it equals an open square bracket, "[",  then some comma separated information followed by a closed square bracket, "]". This is the information submitted through the Form as a list. A list is separated data with an unseen reference called an index. The index starts counting from 0. The first piece of data in the list is the timestamp. Let’s grab the timestamp and show it in our log. To return that value only we would use the input object e and the array values in e with the index 0. Logger.log(e.values[0]);

function formResponse(e){
   Logger.log(e.values[0]);
}

When we look at the Logger now we see only the timestamp. With this method we can identify the Email or other response data. We'll look further into how to use the response to do something in the next post. 

Hosting your School site using new Google Sites

It was brought to my attention by a friend that I have been redirecting my naked domain of claycodes.org to the new Google Sites essentially hosting a site for free. The question is how the heck did I do that? Well here's the show from Google and here's the how from me below.

1. Create a New Google Site to redirect to.
2. Publish the site to a folder on your site directory. Be sure to Manage your setting so "Anyone can find and view".
Name Your Site Folder


3. Open your Admin console and go to Apps>GSuite>Sites (Sites is on the second page of apps by default).
4. Scroll to the bottom and expand Web Address Mapping by clicking on it. 
5. Click Add A New Web Address
Add a New Web Address


6. I recommend keeping the NewSites setting, 
7. At Site location enter the Site Folder Name from when you published. Be sure your site is on the domain selected.
Enter the Site Location and Optional Subdomain


8. Use www as your subdomain. 
9. Set up a CNAME of www in your DNS settings. I recommend using Google domains. It makes things easier. Here's how my records are setup for claycodes.org. 
My DNS Records


10. Set your naked domain in Google Admin Panel to redirect to the www subdomain. You can find this in the Domains section.


Give it about an hour and you should be able to hit your new google site from your naked domain. You can also use this to setup subdomains for things like Staff Only websites.


GSuite Security Best Practices

Lance Lennon GSuite Security http://bit.ly/GSFESecurity. 

Lance Lennon - Director of Technology in Iowa with a school of 1000 students. 

Separate your GAFE super admin account. Turn off Email and Chat. Set with 2 factor authentication. Make a complex password. Stay logged out. Only log in when you need to. I think this is one of the most important pieces of advice. An entire district can be compromised. Not following this has pushed the NYCDOE, Google, and AmplifiedIT to develop a district parachute to save GAFE domains.


Create custom admin roles. Why needs access and what access do they need? Use admin roles. The More controls can be access to do this. 
Some admin accounts are pre-made, 
Help Desk Admin - Changes passwords. You can customize further for specific OUs.
Services Admin - Turn services on and off. Give read access to OUs. 

Security - Password Requirements and Recovery. Understand what your requirements are. Set minimum based on this. 
Allow users to turn on for 2-step verification. This will help to prevent hacking. Enforce the 2-step verification for staff. For students it’s not a great idea. They would need to use phones for it. When users log in for the first time it does not redirect them to setup 2-step. 
There is a USB key for those that don’t want to use their phone. YuniKey $25. 
Create a video for 2-step verification. 
Keep it fun and light as you turn key tech requirements. 
The initial setup requires a phone. 


DKIM - DomainKey Identified Mail and SPF Sender Policy are meant to stop and minimize spoofing on emails. 
Need access to DNS. See if your setup at https://toolbox.googleapps.com/apps/main/

Email footers. App does with a footer so it goes out on every email without the student/teachers control. 
Apps>GSuite>Settings>Advanced>Append Footer

GSuite Vs Additional - Age Restrictions on Additional, Support on GSuite, 


Suspend Accounts and move to a different OU . Delete when an account is created in error. Documents remain shared with who they are shared with. Moving accounts doesn’t suspend. Need to actually suspend. GAM can do it. 

With Groups to avoid international spoofing require a suffix to groups. This identifies it as a group. 


Manage Alerts in reports. The reports can be setup to alert when there are too many login attempts. Custom reports can be made to track specific events. Users can be tracked to see what they are doing. 
Login can be reported. 
Specific logins can be tracked if a student needs to be located. The physical IP will identify where they last logged in. 

Block sites to prevent adding personal accounts to their school account. 


Will you remember what’s on your hard drive in September?

We are at that time of year when many schools are already off and New York is just finishing. I’ve spent time between exams taking down the classroom decorations, removing bulletin board backing, saving borders, and filing things away for next year. It dawned on me that we are coached and encouraged to “summerize” our classrooms but not our hard drives. I mean, all that data isn’t going to get dusty. If you’re like me however your brain gets dusty over the summer and that file labeled “meeting.doc” that you were sure you would remember gets forgotten. Yes, we could just open it up but to do that we have to mouse over to it, click rapidly twice and wait. Too many steps just to discover it may not be important at all and in the new school year you have many other important things to put energy into.

Tips for organizing your files for the next year:

  • Make the time to do it. Give yourself the time you need to do this work. We are use to moving around a classroom. Take the time to sit and work through your files
  • Label folders and files clearly. It should be clear to anyone else where to find things. Have a colleague take a look for you and see if they can easily identify where things are. 
  • Group similar folders in a single folder. It can be overwhelming to have to scroll through files and folders to find what you need. Creating an effective nested structure can help make things easily accessible. 
  • Use school years on folders with dated materials. Grades and student work align to particular years. It's best to keep the work in folders dated by year for reference. 
  • Backup hard drives. Hard drives fail and we cry. Creating physical copies of important files or moving things to the cloud can save you from having to rewrite all those lessons. 
  • Copy cloud folders. I like to have all the materials I developed in my personal account as a backup. Use Google Takeout or Gsuitetips Copy Folder to move your personal digital resources. 
  • Color code and emojize your folders. While this can add a bit of levity to what you are doing it also makes things very easy to find at a glance. It's also a fun trick to show students. 

Just as you would clean up a classroom, stow and secure all your digital resources. Clearly label folders. Even if there’s many of them. Consider grouping folders in other folders. I do courses then each course gets a folder within for resources, lesson plans, gradebook and so on. I break my resources into printable (rare in the digital age), videos, files. I also keep duplicates within the individual lesson folder. Inevitably I’ll remember the resource but not the lesson I used it with.


Check the mysterious files. I’m one of those who opens a new blank document to show off some feature and then gets pulled into something else so the document gets closed and saved with an untitled name and garbage information in it. If I remember I’ll delete it later but they do slip by me. I found over a dozen in this year’s drive to clean. Force yourself to check each file you may not recognize. If you can, get rid of it. You save yourself some confusion later.

Back up everything. Google, OneDrive, iCloud, Box, Dropbox are amazing places to keep your data. It does happen that passwords get forgotten and accounts get locked for various reasons. Hard drives do fail and data becomes unrecoverable. You may have a backup system running but it’s still important to put files in a place you feel in control of. Use a spare USB drive, External Hard drive, or an online cloud storage. If you are keeping files in Google drive on your school's domain you can take a copy of all your files with you. Use Google Takeout to download a zip. Or to keep the google file type share a folder from your personal account to your school account. Put all the documents and folders you want backed up from the school account in the shared folder. From your non-school account sign in and use Gsuitetips Copy Folder and follow the steps to make a copy and retain the folder and file structure. 

And in case you need to know about making Emoji Folders:

Applying Digital Skills in the everyday classroom

Our students come to us with interests, some with passions. How can we harness that interest/passion and teach them the digital skills they need for success in the workplace? 


Google has begun supporting the digital learner with a framework of video centered activities to teach the digital skills of GSuite while engaging with curriculum content. Applied Digital Skills has been released for the CSFirst team to teach the GSuite along side some virtually authentic tasks. Students have the opportunity to explore data analysis while creating a concept for the next big blockbuster movie, make a map of some favorite places from a sheet, or do some organized college research.

What Google Provides:
  • 20 units of authentic tasks which can be tailored to the student. 
  • Lesson plans for the teacher with actionable tips on teaching each one. 
  • Rubrics: Customizable with created project samples. 
  • Tracking of student activity. 
  • Extension tasks. 
  • Videos with transcripts (transcripts only can be translated) of demonstrated instruction.
  • Steps bulleted as a summery of action. 

What you need to figure out:
  • How work will be turned in. I recommend using Google Classroom and linking the activity as a resource. Materials are some times built on top of so if you are taking a series of assessment snapshots ask students to turn in a copy of their work so you don't have to rely on Version History. 
  • What topic(s) you will center the lesson around. Not all lessons provide the opportunity to frame the work around a content topic. Be sure to review the work first. 
  • A full set of devices for your class to use. While this can be done in small groups it's best geared to a 1-to-1 environment. It's developed to support students working at their own pace which means they need the digital ability to do so. Devices do work for this so if you are a BYOD environment even with cell phones it can function for you. 
  • How to do the work students are doing. Don't be fooled into thinking this is a simple learn how to alternate row colors in a spreadsheet. The lessons shift into basic programming and you will have a lot of questions you won't expect unless you do it yourself first and even a second time. If you are new to GSuite put yourself out there and take the risk to do it with them. 
  • Why are you doing this work. The why is very important to students. The dreaded answer I get when we talk about why we do something is, "for a grade". That's the soul killer for all of us. Develop with your students the "Why" so it's authentic and has a real world impact. If you are doing an If-Then Story partner with another class or elementary grade and make the "Why" about developing stories for them. 


All students need digital skills. Not just in Digital Citizenship but also in Digital Production/Creation. We need to develop students that not only have content knowledge but will think beyond the facts and innovate the future. Giving students an end goal product and allowing them to select what fills it supports developing digital production skills while exploring passions. Google has provided the framework for just that. A student passionate about sports can be directed to develop an interactive spreadsheet of their favorite sports icons. Add in a map of where each player grew up. Compare players through an interactive slide deck discussing the pros and cons of each player while including comparison graphs as evidence. Wrap all this up into a website and we have a completed project which has taught a student more than just content. They’ve developed digital skills which can be applied to the workplace.

According to Bloomberg our students are most hirable when they can creatively problem-solve, communicate, think strategically, and lead. To do all this our students need to be able to Apply Digital Skills. 


Project based learning with the teacher as facilitator and differentiated delivery of instruction and assessment is a recent push in education. Don’t just talk at them, engage them in building authentic projects and even better if they have real world applications. I would even augment the previous example to suggest students interested in this subject working as a group pick an accessible local sports community team as their topic. Students become connected to an authentic audience and work with real data and information making the experience more meaningful in an ideal world.

While my experience with the Applied Digital Skills delivery platform from the teacher side hasn’t been without issue, I have found the guided activities accessible and helpful for many learners. It gives an entry point for each and works best in a classroom when all learners have access to technology on a 1-to-1 basis. It can work in grouped technology settings but some students may be left behind. I recommend weaving the units as self contained pieces through out your regular curriculum. Thank Google for helping us to develop applicable digital skills. 


Supporting Our Itinerant Population One Classroom at a Time


Image result for google classroom
How can we better support an itinerant population?
I recently had the pleasure of working with members of District 75 training them in how to use the G-Suite. I knew D75 as supporting those students who may be caught up in the court system. I hadn’t considered how our students personal issues can make a tough teaching situation even tougher.

Here’s the bullet pointed list of what I recommend to support an itinerant population:
  • Use classrooms as units rather than full classes. Small chunks of assignments to complete are more reasonable to a population dealing with so much personally.
  • Pre-Assign all work in classroom before students. They can enter the digital class and see what is expected. So much else of their lives are unknown factor. Give them expectations they can know and meet. 
  • Give an index for students to refer to. A Google Keep they can copy or Doc/Sheet with check offs could help them keep on task. 
  • Naming conventions are needed for every post. Don’t just identify what it is but also where it falls in the order. 

Every student deserves a chance. They also deserve more chances after they screw up. It’s education after all and that takes trial and error. While sometimes our students create their own pattern of negative life choices it doesn’t mean we give up. District 75 is the unique district within all our districts supporting those students working to break out of their negative life patterns.
While working with the teachers it became clear that technology can solve many of the problems students and teachers face when the classroom isn’t always physically or socially/emotionally accessible. We worked through Google classroom not as a semester’s solution but as small bite size classes. 
Say you are a student no longer in the school environment you are familiar with, surrounded by teachers you don’t know and classwork you didn’t expect. At the same time you are dealing with something personal which may affect years of the rest of your life. I don’t think could not handle much school work in such a situation. Being shown a classroom of twenty uncompleted lessons is overwhelming. A view of a few days or a week or two of work is more reasonable. Those students starting over may also have a strong reaction to a mound of work assigned at once. Ultimately breaking up the assignments into chunks can provide a reasonable looking way to deliver content.
So why not design units of instruction as a class. Students enter and exit the classroom frequently and may be absent for longer than normal periods. While their lives drastically change around them they could use us as a constant to support them. While some students shift out of one “classroom”/unit others may remain and still others may join. 
So what do we need to support such a population? In my opinion, a way to deliver content in units to individual students. A GClass can be used to individually assign to students however this is a massive amount of work for the teacher. In using individual classrooms we can add students throughout the year. As they advance they can be shuffled to another GClass or to a GClass which may meet their needs. 
An index or clear learning pathway is also helpful to a struggling student. Create a Doc or Keep with an ordered path. Identify main assignments and secondary supporting understanding assignments. Copy the assignment links in classroom and link to the indexed items. This path can be used by students to navigate their education on an individual path. One thing was brought up by the team which I think can most help an itinerant population: Naming Conventions. If a student comes to class Wednesday they want to know what they need to complete from Monday and Tuesday. If we as teachers can be more cognizant of name our assignments with dates our students can better support their own education. If you are a teacher that excuses work based on the date you can better correlate attendance records. Students will know what is expected of them and be able to improve their success. 


Social Emotional Well-Being During Online Teaching and Learning

The world is a bit nutty right now because of the COVID-19 pandemic. Schools are switching to online learning and parents are working from...